Want to know How to build a basic Salesforce REST API Integration? In today’s post, GoSquared’s Sales Engineer Russell Vaughan will show you how.
Being in the Software as a Service space, you have to admire what Salesforce has managed to accomplish. It would be hard to argue their success, particularly at the enterprise customer level.
While they have one of the most tuned and well-known sales approaches in software, there is almost a feeling that when a company gets to a certain size, they just decide it’s time to use Salesforce. It’s due to this that if you have a product that operates in the Sales and Marketing space, there is huge opportunity in tapping into the Salesforce community and ecosystem.
For example, we’ve built the GoSquared Salesforce integration to capture the on-site behaviour of leads when they’re browsing your website (E.g. when a lead views your pricing page or watches a webinar), and send this directly into Salesforce ready for your sales team to act on within their existing workflow.
Digging into the Salesforce developer ecosystem
With a company that has the breadth and depth of product that Salesforce offers, there will always be pros and cons to getting your head around their documentation and terminology.
They have an incredible developer community, including their own Stackoverflow-esque forums. If you hit a road block, it’s likely someone’s hit it before you and you can find a documented solution.
Similarly they have an extremely robust e-learning platform with tracks that you can complete across a plethora of different subjects to get up to speed on a lot of their terminology and principals.
There can, however, be an abundance of content to sift through and it can be an incredibly time consuming process – particularly if building and developing on the Salesforce Platform is not going to be the core responsibility of your job!
This blog post is really focused around communicating, at a very basic level, the key concepts needed to build a basic Salesforce REST API integration.
Salesforce REST API Integration vs Salesforce App
It’s important to highlight the difference between a Salesforce REST API integration and a Salesforce app that you’d find on their AppExchange (essentially the Salesforce App Store.)
Listing an app within the Salesforce AppExchange will give you the ability to build your product directly into the Salesforce platform. For example, visualising your product’s data directly within a component in Salesforce. While there are clear benefits in having a presence within this ecosystem it’s important to note that there are some costs associated with doing so.
A REST API integration is a lot simpler and is primarily focused around sending data from your application and fetching data from Salesforce. Currently there is no cost associated with this type of integration however it’s worth noting that REST integrations are only accessible to Salesforce users on their enterprise plans (there is scope to get REST API access on Professional and Group editions but involves getting your app whitelisted.)
For the purposes of this post, our example REST API integration is going to be super basic. Our app is going to have customer data that we want to send to Salesforce and there will be customer data in Salesforce that we want to retrieve.
Essentially then, our REST API integration is going to need to do 3 critical things:
- Allow a user of our application to authorise us to access and transfer their Salesforce data on their behalf.
- Allow a user to push data from our application to Salesforce.
- Allow a user to retrieve Salesforce data to be used within our app.
Getting set up with Salesforce
Create a free developer account
Start by getting yourself a free Salesforce Developer account.
The Salesforce developer accounts are awesome and pretty much give you a working Salesforce organisation (an organisation is Salesforce’s terminology for an account) so you can get a feel for the interface and even add and manage users.
Set up a Connected App
Once you have your developer account set up you’ll want to set up a Connected App. Connected Apps have the ability to offer a lot of functionality and sometimes that can make it a bit difficult to get your head around them.
For the purposes of this and how we’re going to use it, it’s easiest to think of a connected app as a small app that sits on Salesforce’s infrastructure that you point your integration to. It is responsible for managing the authentication and also the routing of requests to the relevant client instances.
Once you’ve set up your Salesforce developer account, you can set up a connected app by clicking the Setup icon in the top-right navigation menu and select Setup.
Enter App Manager in the Quick Find box and then select App Manager.

1. Click New Connected App.
2. In the New Connected App form, fill in:
In the Basic Information section:
- Connect App Name: YourAppName.
- API Name: this will automatically become ‘YourAppName’.
- Contact Email: enter your email address.
In the API (Enable OAuth Settings) section:
- Check Enable OAuth Settings.
- Callback URL: enter your callback url, example: https://www.yourappname.com/api/callback
This will be the URL which Salesforce POSTs to when the user has authorised your app to access their data. This will include the access and request token (we’ll explain a bit more on this below but they are essential to be able to send and receive data.) So if you don’t have one already, you’ll need to set up an endpoint who’s role it is to receive and handle this request.
Under Selected OAuth Scopes:
- Select Access and manage your data (API).
- Click Add.
Once you’ve set up your app, you’ll be given a Consumer Key and a Consumer Secret for you app.
The basic Salesforce Oauth data flow
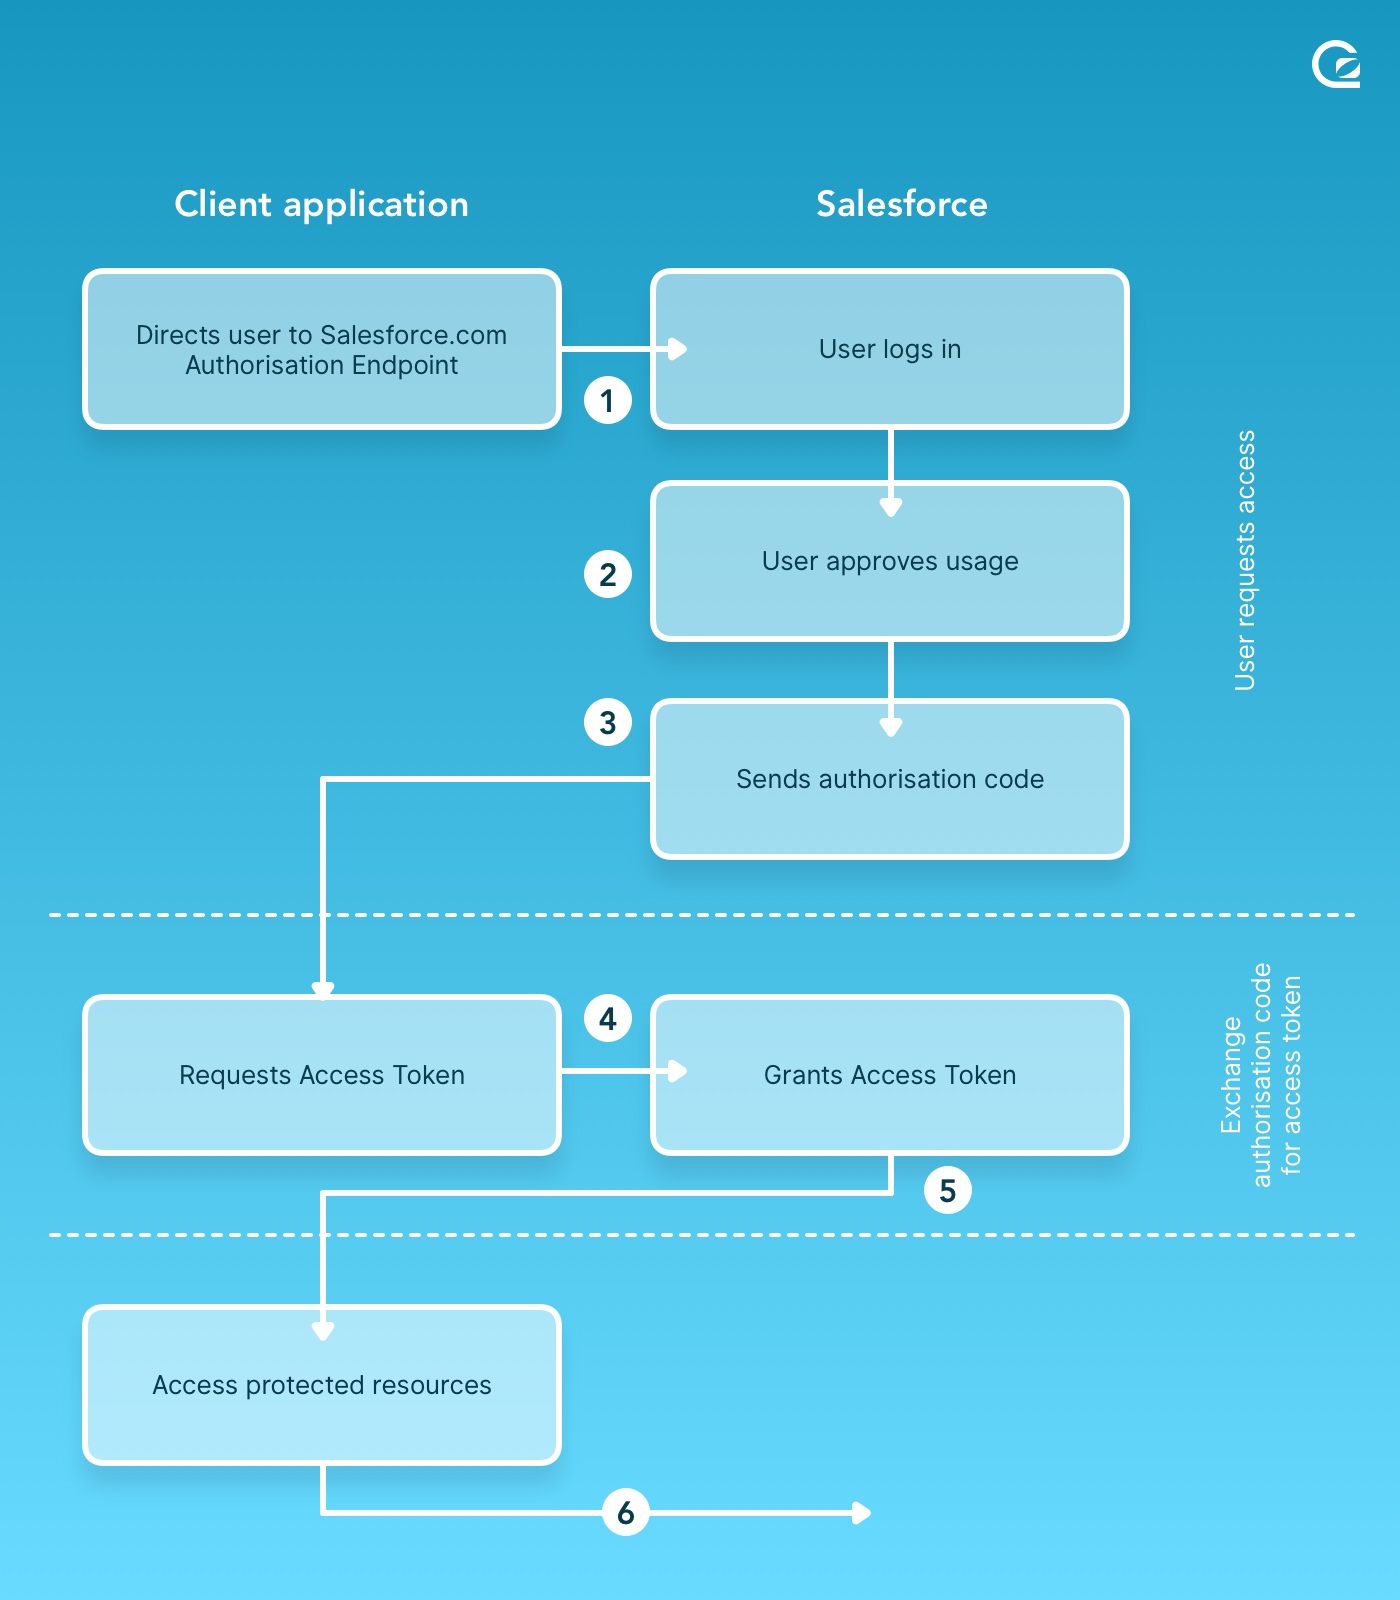
With the connected app set up, its handy to get an idea of how the data flow works.
To start, your user is directed to a Saleforce.com authorisation endpoint, there they log in and approve access for your app to access their data.
After a successful authorisation Salesforce sends a response with an Access token and Refresh token.
The Access token is to be passed in the header of all API requests for data. This token has an expiry date and will always expire. By default the Connected Apps have an access token with an expiry of 15 minutes (inline with the sessions settings within your Salesforce settings).
The Refresh token is to be used to retrieve a valid access token (e.g. when the current access token expires). You can change the expiry settings on this but you can also set this never to expire, only when it revoked.
Example API calls:
To make the initial authorisation request for a user to grant your app access to their data (this is where your user is initially directed to a Saleforce.com authorisation endpoint and logs in) you’d make the following request. The client_id in the below call will be your consumer ID from the connected app. The redirect_uri will be the Callback URL.
curl https://login.salesforce.com/services/oauth2/authorize?response_type=code
&client_id=YOURCONSUMERID&redirect_uri=https://www.yourappname.com/api/callback
A successful response from this will redirect the page to a Salesforce login page where the user is able to login and authenticate. After Salesforce confirms that the client has authorised your app to access their data, the end-user’s browser is redirected to the callback URL you’ve specified by the redirect_uri parameter. Salesforce then appends an authorisation code to the redirect URL, their request will look similar to the below.
https://www.yourappname.com/api/callback?code=aWekysIEeqM9PiThEfm0Cnr6MoLIfwWyRJcqOqHdF8f9INokharAS09ia7UNP6RiVScerfhc4w%3D%3D
You’ll use this as the value for your code parameter when you make a request to Salesforce’s token endpoint to receive your Access and Refresh Token.
Example request:
curl login.salesforce.com/services/oauth2/token?grant_type=authorization_code&redirect_uri=https://www.yourappname.com/api/callback&client_id=YOUR_CONSUMER_ID&client_secret=YOUR_CONSUMER_SECRET&code=aWekysIEeqM9PiThEfm0Cnr6MoLIfwWyRJcqOqHdF8f9INokharAS09ia7UNP6RiVScerfhc4w%3D%3D
Example Response:
{
  "access_token": "YOUR_ACCESS_TOKEN",
  "refresh_token": "YOUR_REFRESH_TOKEN",
  "signature": "signature",
  "scope": "refresh_token api id",
  "instance_url": "https://instance.salesforce.com",
  "id": "https://login.salesforce.com/id/id,
  "token_type": "Bearer",
  "issued_at": "timestamp"
}
Outside of the access and response token, the instance_url is import also. It’s what you’ll need to build the base of your future API calls.
Now we have the access token, we’re able to start making requests to send and receive data on our users behalf. Something to keep in mind though, as mentioned earlier, is that these access tokens will always expire at some point.
Due to that, you’ll want to keep your access token up to date by making a call to the token endpoint and changing the grant_type to ‘refresh_token’ along with including the refresh token you had received in the previous call.
Example call:
curl https://login.salesforce.com/services/oauth2/token?grant_type=refresh_token&client_id=YOUR_CONSUMER__ID&client_secret=YOUR_CONSUMER__SECRET&refresh_token=YOUR_REFRESH_TOKEN
Example response:
{
  "access_token": "REFRESHED_ACCESS_TOKEN",
  "signature": "signature",
  "scope": "refresh_token id api",
  "instance_url": "https://INSTANCE.salesforce.com",
  "id": "https://login.salesforce.com/id/idE",
  "token_type": "Bearer",
  "issued_at": "timestamp"
}
Now we have a way to keep our access tokens valid and up to date, we’re set up and ready to start working with Salesforce objects.
Understanding Salesforce objects
Salesforce objects (sobjects) are effectively database tables that contain an organisation’s data. Examples of standard Salesforce objects will be “Accounts”, “Contacts”, “Leads”, and “Tasks.” You also have scope to create your own custom objects.
A Salesforce record describes a specific occurrence of an object (such as a specific contact like “Jonny Appleseed” that is represented by a Contact object). A basic comparison would be like a row in a database table.
For the following examples, we’re just going to focus on Contacts.
Send data from your app to Salesforce
Creating a contact in salesforce is really straightforward. You just need to build the API url using the instance from your access token response and use the access token value as your bearer token in the header.
One thing to keep an eye out for through is for characters that need to be escaped in your access token.
For example this access token should have the exclamation mark escaped
So this:
00D1r000000dumU!AQEAQFd.O1Q5DVQrUYvr.........
Becomes this:
00D1r000000dumU\!AQEAQFd.O1Q5DVQrUYvr........
you can then make the below call to create a contact.
Example request
curl https://INSTANCE.salesforce.com/services/data/v42.0/sobjects/Contact -H "Authorization: Bearer YOUR_ACCESS_TOKEN" -H "Content-Type: application/json" -d '{"FirstName" : "Johnny", "LastName" : "Appleseed"}'
(Your contact will need a last name as the minimum for an entry to be created.)
The response you get back will be the id of your contact
{"id":"0031r000029NDckAAG","success":true,"errors":[]}
Which will also let you build a link directly to the contact.
https://INSTANCE.salesforce.com/0031r000029NDckAAG
Retrieving data from Salesforce to your app
If you want to retrieve a list of contacts there are a few ways you can do it. You can make a request to the contact endpoint and it will return a bunch of information about your contacts that I found a bit cumbersome to navigate.
I actually prefer to use a combination a contacts ‘describe’ endpoint, which will return all of the fields we can populate about our user.
Example request:
curl https://INSTANCE.salesforce.com/services/data/v20.0/sobjects/Contact/describe -H "Authorization: Bearer YOUR_ACCESS_TOKEN"
That will give a detailed response of all of the fields available. (I’ve just given an example of the ‘first name’ element for brevity)
{
      "autoNumber": false,
      "byteLength": 120,
      "calculated": false,
      "calculatedFormula": null,
      "caseSensitive": false,
      "controllerName": null,
      "createable": true,
      "custom": false,
      "defaultValue": null,
      "defaultValueFormula": null,
      "defaultedOnCreate": false,
      "dependentPicklist": false,
      "deprecatedAndHidden": false,
      "digits": 0,
      "externalId": false,
      "filterable": true,
      "groupable": true,
      "htmlFormatted": false,
      "idLookup": false,
      "inlineHelpText": null,
      "label": "First Name",
      "length": 40,
      "name": "FirstName",
      "nameField": false,
      "namePointing": false,
      "nillable": true,
      "picklistValues": [],
      "precision": 0,
      "referenceTo": [],
      "relationshipName": null,
      "relationshipOrder": null,
      "restrictedPicklist": false,
      "scale": 0,
      "soapType": "xsd:string",
      "sortable": true,
      "type": "string",
      "unique": false,
      "updateable": true,
      "writeRequiresMasterRead": false
    }
Once you’ve got the fields you can then use them (or a selection) to build a custom query:
curl https://INstance.salesforce.com/services/data/v42.0/query/?q=SELECT+id,name,email,phone+from+Contact -H 'Authorization: Bearer YOUR_ACCESS_TOKEN'
That will return all contacts with their associated properties.
{"totalSize":1,"done":true,"records":[{"attributes":{"type":"Contact","url":"/services/data/v42.0/sobjects/Contact/id"},"Id":"id","Name":"Jonny Appleseed","Email":"jonny.appleseed@myfriend.com","Phone":"555-555-555"} ]}
That should now give you a way to retrieve contact data from Salesforce to use within your app.
Further resources
Hopefully that gives a good enough foundation to start exploring more of the Salesforce objects you can interact with through a REST API integration. Here are some additional resources to more in-depth information about the Salesforce REST endpoints.
- Salesforce REST API Documentation
- Documentation for Salesforce Objects
- Salesforce Trailhead Community
- GoSquared Salesforce Integration
Questions or comments on how to build a basic Salesforce REST API Integration?
We hope you’ve enjoyed this post on building a basic Salesforce REST API Integration, brought to you by GoSquared. Our award-winning software including Engage, Live Chat for Sales and Analytics helps businesses understand and engage with their customers.
Feel free to reach out to the author Russell Vaughan on Twitter with any questions or feedback you have about this post! If you’d like us to cover any other Salesforce topics, or any other technical discussions let us know too.
If you’ve enjoyed this post, be sure to subscribe to the GoSquared newsletter. It’s free, and you’ll receive our latest tips and tricks on all things growth for your business.